# vuepress 블로그 커스텀 개발 일지
# 뷰프레스1 사이드바 스크롤 디자인 변경
.vuepress/theme/components/Sidebar.vue
.sidebar::-webkit-scrollbar {
  width: 5px;
  background-color: #00988d36;
}
.sidebar::-webkit-scrollbar-thumb {
  background-color: #09978da8;
}
2
3
4
5
6
7
# vuepress tag page 넣기
.vuepress/components에TagLinks.vue만들어 준다.내 입맛에 맞게 약간 수정.
data() 는 에디터에서 빨간줄 뜨길래 걍 넣어줬음.
난 그냥 최상단 마크다운에 태그 리스트 페이지 넣을거기 때문에 path도 수정해줬음.
<template lang="html">
  <div>
    <router-link
      v-for="tag in $page.frontmatter.tags"
      :key="tag"
      :to="{ path: `/#${tag}` }"
    >
      #{{ tag }}
    </router-link>
  </div>
</template>

<script>
export default {
  data() {
    return {
      msg: "Hello this is <demo-component>",
    };
  },
};
</script>
2
3
4
5
6
7
8
9
10
11
12
13
14
15
16
17
18
19
20
21
- 참고한 블로그는 마크다운 글에
<Taglinks />넣어줬지만 매번 넣기 귀찮으므로 걍 page 에 박아줬다
-- .vuepress\components\page.vue
<template>
  <main class="page">
    <slot name="top" />

    <Content class="theme-default-content" />
    <TagLinks class="theme-default-content"/>
    <Comment class="theme-default-content" :key="location"/>
    <PageEdit />

    <PageNav v-bind="{ sidebarItems }" />

    <slot name="bottom" />
  </main>
</template>

<script>
import PageEdit from '@theme/components/PageEdit.vue'
import PageNav from '@theme/components/PageNav.vue'
import Comment from '@components/Comment.vue'
import TagLinks from '@components/TagLinks.vue'

export default {
  components: { PageEdit, PageNav, Comment, TagLinks },
2
3
4
5
6
7
8
9
10
11
12
13
14
15
16
17
18
19
20
21
22
23
24
이왕 하는김에 alias 추가
--config.js
configureWebpack: {
    resolve: {
      alias: {
        '@image': '/src/image/',
        '@components' : '/src/.vuepress/components/'
      }
    }
  },
2
3
4
5
6
7
8
9
- 내 최상단 페이지에 넣을 태그리스트 컴포넌트 추가.
마찬가지로 path 수정해줬음
<template lang="html">
  <div>
    <span v-for="tag in Object.keys(tags)">
      <h2 :id="tag">
        <router-link
          :to="{ path: `#${tag}` }"
          class="header-anchor"
          aria-hidden="true"
          >#</router-link
        >
        {{ tag }}
      </h2>
      <ul>
        <li v-for="page in tags[tag]">
          <router-link :to="{ path: page.path }">{{ page.title }}</router-link>
        </li>
      </ul>
    </span>
  </div>
</template>
2
3
4
5
6
7
8
9
10
11
12
13
14
15
16
17
18
19
20
- 내 최상단 README.md 에
<TagList />넣어줌.
이제 블로그 최상단 메인 페이지에 깔끔하게 태그만 뜬다 짝짝짞
# vuepress 블로그 sidebar 자동 생성
vuepress는 다 괜찮은데 게시글을 하나 생성할때마다 설정 파일에 경로를 지정해 줘야 하는게 상당히 귀찮다.
vuepress에서 기본으로 제공하는 sidebar: 'auto' 옵션은 는 한 페이지만 나오는 거였다 ㅠㅠ.. 여러 블로그랑 npm package를 봤는데 전부 다 내가 원하는 모양새가 아니었다. 내가 원하는건 재 폴더 구조대로 그냥 1뎁스로 깔끔하게 펼쳐져서 노출 시키는 건데.. (stack edit에서도 편집하기 쉽게..)
https://techformist.com/automatic-dynamic-sidebar-vuepress/ (opens new window)
위 블로그에서 마지막 솔루션으로 직접 개발하는것에 아이디어를 얻어사이드바에 내 폴더 구조대로 노출 시킬수 있게 변경해 보았다.
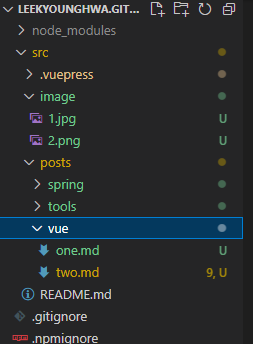
내 폴더 구조
기존 side bar 설정을 지우고 동적으로 읽을 수 있게 함수를 생성해 주었다.
// src/.vuepress/config.js

themeConfig: {
    repo: '',
    editLinks: false,
    docsDir: '',
    editLinkText: '',
    lastUpdated: true,
    sidebar: {
      '/': getSideBar()
    }
    /*
    sidebar: {
      '/': [
        {
          title: 'spring',
          collapsable: false,
          children: [
            'posts/spring/one',
            'posts/spring/two'
          ]
        },
        {
          title: 'tools',
          collapsable: false,
          children: [
            'posts/tools/one',
            'posts/tools/two'
          ]
        },
        {
          title: 'vue',
          collapsable: false,
          children: [
            'posts/vue/one',
            'posts/vue/two'
          ]
        }
      ]
    */

function getSideBar() {
  const src = './src/';
  const posts = 'posts'
  const fs = require('fs');
  const fileList = [];
  fs.readdirSync(src+posts).forEach(file => {
    const childrenList = [];
    fs.readdirSync(src+posts+'/'+file).forEach(fileName => {
      childrenList.push((posts+'/'+file+'/'+fileName).replace('.md',''))
    });
    fileList.push({'title' : file, 'collapsable' : false, 'children' : childrenList});
  });
  return fileList;
}
2
3
4
5
6
7
8
9
10
11
12
13
14
15
16
17
18
19
20
21
22
23
24
25
26
27
28
29
30
31
32
33
34
35
36
37
38
39
40
41
42
43
44
45
46
47
48
49
50
51
52
53
54
55
202312월.. 점점 글이 많아져서 collapsable : true로 접어줬다.
이제 마크다운 파일만 생성해주면 사이드바에 자동으로 추가된다!
# vuepress utterance 댓글기능추가하기
블로그 (opens new window) 참고 하였다.. 이분은 패키지를 새로 설치 하셨지만 그냥 vue press를 수정하면 안되나? 하는 생각에.. vuepress 직접 수정 했다
- theme/components/Comment.vue 파일 생성
<template>
  <div ref="comment"></div>
</template>
<script>
export default {
  mounted() {
    // script tag 생성
    const utterances = document.createElement("script");
    utterances.type = "text/javascript";
    utterances.async = true;
    utterances.crossorigin = "anonymous";
    utterances.src = "https://utteranc.es/client.js";

    utterances.setAttribute("issue-term", "pathname"); // pathname|url|title|og:title 중 택 1
    utterances.setAttribute("theme", "github-light"); // theme 설정 (github-light, github-dark, preferred-color-scheme, github-dark-orange, icy-dark, dark-blue, photon-dark, boxy-light) 중 하나 선택
    utterances.setAttribute("repo", `LEEKYOUNGHWA/blog-comment`); // 주의!! 사용할 repository

    this.$refs.comment.appendChild(utterances);
  }
};
</script>
2
3
4
5
6
7
8
9
10
11
12
13
14
15
16
17
18
19
20
21
TIP
참고한 블로그에서 blog-comment 라는 레파지토리를 새로 만들어서 쓰고 있어서 별 생각 없이 따라했었는데 굳이 새로 만들지 않아도 된다.
블로그 세팅한 레파지토리 넣어도됨.
utterances.setAttribute("repo", "LEEKYOUNGHWA/LEEKYOUNGHWA.github.io");
- theme/components/Page.vue 수정
// theme/components/Page.vue
<template>
  <main class="page">
    <slot name="top" />

    <Content class="theme-default-content" />
    <Comment/>
    <PageEdit />

    <PageNav v-bind="{ sidebarItems }" />

    <slot name="bottom" />
  </main>
</template>

<script>
import PageEdit from '@theme/components/PageEdit.vue'
import PageNav from '@theme/components/PageNav.vue'
import Comment from '@theme/components/Comment.vue'

export default {
  components: { PageEdit, PageNav, Comment },
  props: ['sidebarItems']
}
</script>
2
3
4
5
6
7
8
9
10
11
12
13
14
15
16
17
18
19
20
21
22
23
24
25
댓글창은 떳으나... 사이드바로 메뉴 이동시 댓글창이 바뀌지 않았다.. (새로고침이나 url 이동시에는 정상 동작해서 뒤늦게 발견했다.. ㅠ) 사이드바로 이동시 컨텐츠만 업데이트 되어서 Comment 컴포넌트는 그대로 유지되는 듯 했다. 페이지 전체를 reload 하지 않고 comment component만 업데이트 시키는 로직을 추가해 주었다.
현재 url path를 키값으로 설정하여 변경 감지시 <Comment/> component를 강제 업데이트 시켜주었다.
observing dom changes (opens new window) vue force rerender (opens new window)
// 최종!
// theme/components/Page.vue
<template>
  <main class="page">
    <slot name="top" />

    <Content class="theme-default-content" />
    <Comment :key="location"/>
    <PageEdit />

    <PageNav v-bind="{ sidebarItems }" />

    <slot name="bottom" />
  </main>
</template>

<script>
import PageEdit from '@theme/components/PageEdit.vue'
import PageNav from '@theme/components/PageNav.vue'
import Comment from '@theme/components/Comment.vue'

export default {
  components: { PageEdit, PageNav, Comment },
  props: ['sidebarItems'],
  data () {
    return {
      location: location.pathname
    }
  },
  updated() {
    this.$nextTick(() => {
      this.location = location.pathname;
    })
  },
}
</script>
2
3
4
5
6
7
8
9
10
11
12
13
14
15
16
17
18
19
20
21
22
23
24
25
26
27
28
29
30
31
32
33
34
35
36
# vuepress 이미지 경로 설정
https://vuepress.vuejs.org/guide/assets.html#relative-urls (opens new window)
관리하는 방법은 여러가지가 있겠지만.. 난 최상단 폴더에서 image 폴더 생성하여 관리하고 있다.
configureWebpack: {
    resolve: {
      alias: {
        '@image': '/src/image/'
      }
    }
  }
2
3
4
5
6
7
markdown에서 사용할때는 이렇게
